On Assignment: Mum for Fuji

For the last couple of years, I have been involved in the planning process for the Fuji X-Pro 2. I’ve been using a pre-production unit since October. One of the photos I did for them (the only one where I used flash, actually) is the miniature chrysanthemum seen above.

Up for a quick game of Guess the Light? Then take a moment before reading on. And I’ll give you this much: it’s done with a single speedlight.Read more »

Twitter QA: The Magic Lamp

I get Twitter upstreams pretty often, and enjoy seeing photos from Strobist readers and answering questions when possible. I don’t do full-blown critiques or portfolio reviews because of time restraints and an utter lack of any qualification to judge other photographers on my part. But a pic and a Q? Sure, I’m down for that.

Reader Mans Duffani, from Benghazi, Libya tweeted the above photo—a beautiful portrait—to me. It’s a great example of a strong photo that could have been made even better if Mans had taken a moment while shooting to consider the image from front to back. Read more »

Introducing The Photographer’s Oil Collective

For almost ten years now, Strobist has embraced the idea that by freely sharing knowledge we can all learn to make better photos. And because photography is now digital, with low barriers to entry and instant visual feedback, that learning process is simpler than ever.

As photographers, we owe much to the ease of the digital process. But digital has also stripped much of the value from our work. Ones and zeroes want to be free.

Starting today, the Photographer’s Oil Collective is a strong push back against that trend. Rather than just creating painterly light, a photographer can now create a museum-quality oil painting. And it can be done at a surprisingly accessible cost.

The portrait above is a painting, done by POC artist Zhixing Zhang from a photo by Moscow-based photographer Alex Mazurov. As a photo, it was one of many. As a painting, it is a one-of-a-kind object, designed and destined to last.

I first ventured into the rabbit hole of oil reproduction in 2012. It started as an idea—a lark, really—to translate a photo that had great sentimental value into something that would exist in our family for many generations.

Having shot the photo of my kids in 2008, I was long familiar with it. But when the painting (seen above) arrived I was overwhelmed by how strongly I was drawn to it. It somehow felt much more significant than the photo. A collaboration between subject, photographer and a skilled artist 10,000 miles away.

A painting is just different. It is a time-consuming and organic process, with half a dozen layers of semi-transparent oil. Skin tones look luminous.

My first experience with this was that of an enthusiast photographer. Literally, a dad with a camera. As I spent more time with the painting, and thinking about the personal value that it unlocked for me, I starting thinking of it in the context of professional photographers. With the right painters and the right training (on both sides of the image creation process) this could unlock great value and entirely new business models for us.

With prints, we quietly acknowledge that we are competing on price with the neighborhood Costco. With paintings, we are competing with artists who routinely charge thousands of dollars for a simple portrait. And much more for larger/more complex work.

But in theory, we could produce better work—and at a cost that would create a great business model for photographers. There was so much potential.

So I traveled to Xiamen, China, where Zhixing Zhang lives and paints. Xiamen is a world center for commercial oil painting, and Mr. Zhang is a leader in the community of artists who live there. With the help of a team of local art directors and translators, we searched among the over 5,000 oil painters in the city to create a small group of hand-picked artists. As a result, we were now partnered with four of the best reproduction oil painters in the world.

A good start.

But they would need to learn to think like photographers; to develop a better understanding for our needs. They’d have to more closely align their palette with the more muted colors in what the West sees as classic paintings. So we commissioned multiple rounds of paintings from each of our painters, fine-tuning them to be able to better work with us.

(And to the photographers who graciously agreed to be involved in the testing/education process with us: Thank you.)

And the education would not end there. Photographers would also need to learn how to create photos that could be reproduced as high-value oil paintings. For both sides, education would be the key to bridging that knowledge gap. But that sort of thing is our bread and butter at Strobist.

The information photographers need to know (to meet the painters halfway) is now in place. And we are adding to that knowledge base continually. Our growing list of white papers will include education on technical considerations, shooting/lighting methods, business models and more. In short, it will contain everything you will need to become capable of producing a world-class painting—for your clients, or for yourself.

I have spent the last ten years learning to think outside of the box as a photographer; to challenge assumptions and to unlock possibilities. Strobist is one of the results of that line of thinking.

Today, I am equally proud to introduce the Photographer’s Oil Collective. With studios in Xiamen, and administrative offices in Dubai, literally any photographer in the world can now offer museum-quality oil portraiture for their clients.
__________

Credits, from top:
POC Painting by Zhixing Zhang from a Photo by Alex Mazurov
POC Painting by Zhixing Zhang from a Photo by David Hobby
POC Painting by Zhixing Zhang from a Photo by R.J. Kern

From front page, L to R:
POC Painting by Zhixing Zhang from a Photo by Brian Rickey
POC Painting by Ivy Lin from a Photo by Ivan Kosmynin
POC Painting by Zhixing Zhang from a Photo by Alex Mazurov
POC Painting by Thomas Linn from a Photo by David Hobby
POC Painting by Ivy Lin from a Photo by Bill Gekas

Remodeling a Room? Think Like a Photographer

Long-time readers of this site are already familiar with my family, having watched my kids grow up in photos. Seen above, on the left, is my daughter Emily. You guys met her when she was eight.

She’s seventeen now, and headed off to college next year. Which meant this is the last time we’ll put up a Christmas tree while we are all living here together.

I have always tried take lots of photos around the holiday season. And even more so, now that the kids will be graduating soon. And as we have successively remodeled many of the rooms in our house, I have made it a point to pay special attention to the lighting.

Why? Because you can get a lot of bang for your buck when it comes how a room looks just by thinking like a photographer during the remodel. And another bonus is that your quick available light grab shots will look much better, too. Even if you are just using your iPhone to shoot it.

Take the living room, for instance. Before remodel, it was lit mainly by a small, four-bulb fixture attached to a ceiling fan. You can probably imagine just how flattering this wasn’t. And it was something that bugged me enough to lobby to get rid of the fan just so we could have more of a choice about our lighting.

In the end, I got the okay. And I have long been happy that we did it. Here’s a quick run-through on the decision process for this room, in the hopes that it’ll inspire you to think about how you can use your lighting skills to improve the quality of any room you might choose to remodel in the future.
__________

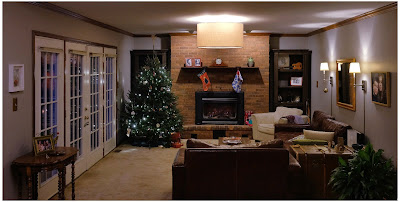
Here’s a photo of the living room as it exists now. Mind you, this is purposely shot available light, as that is kinda the point. The lighting in the room is not designed to exist in an overall interior shot. (In fact, that’s kind of impossible if the lights are part of the subject matter.)

But here it is, available light, to give you a sense of how the lights are working together.

First and most important, the drum lamp hanging from the center of the ceiling. Remember the four-banger bare-lamp light I mentioned earlier? That’s long gone, and replaced by what is essentially a soft box pointing straight down. It’s three feet across—a legit beauty light.

And the arrangement of the room—around the light—means that anyone sitting in the room is sitting under a quiality light source, and at a good angle. The only harsh place to be around this light would be directly under it. And you can’t go there because guess where we put the coffee table.

So if you are sitting on the sofa or the love seat or the chair—you look good. In terms of lighting, it is not unlike sitting in a lounge in a nice hotel, where they have taken the time to design the light for the effect that they want.

And standing or sitting, pretty much anywhere in the room, a snapshot of you is gonna be reasonably flattering. And that’s true whether it was shot on a purpose-built camera or a smartphone. To wit, the example at top of the page.

Over at camera right are two wall lamps, which serve to fill the shadows of the overhead “key” light—or to become pretty nice rim lights for someone sitting on the couch. No major surgery here, as the lamps came with conduit assemblies to run the cords right down the wall. They’re just plugged in behind the couch.

At back are two “can” lights in the ceiling, washing down on the fireplace. They just keep it from going super dark back there. (And of all of the lights, they are the only ones that are built-in, and pre-dated the remodel.)

Two other items of note. One, the lights are all on dimmers. This gives us tons of control of both the absolute level of light and the lighting ratios between the different planes. You really can accomplish a lot of looks with a few different planned-out light sources and some dimmers.

And two, all of the lights are LEDs. Which means that this entire room—seven bulbs—totals only about 36 watts of energy consumption. And that is if they are on full-blast, which they almost never are. I just nuked them up to buy myself some exposure here. We normally keep them pretty subtle and balanced. But that also would look bad in a photo because a light cannot easily serve as both subject matter and light source.

But dialed down, I would guess we are typically lighting the room with around ten watts of power, total. It’s just well-distributed.
__________

Remodel Like a Photographer

When choosing lights for a room remodel, here are some things to think about.

• If you can spring for a big, soft main source, splurge. You won’t regret it. This could mean a drum lamp (we had ours made here) or a light that bounces off the ceiling. In our case, the main light does both. Unseen (from almost exactly my camera position) is a smaller version that hangs down over our dining table. The two light their assigned spaces beautifully and tie the double room together visually.

• Think of task lights as doing double-duty. First, they accent a room. Second, they fill the main light. Oh, wait, make that three—they can also create mood by dimming them down and using them without the main.

• LED bulbs are getting better and better—they have passed CFL lights—and will save you tons of money over their lifespan. Good quality ones are as low as $5 at Home Depot (these are Philips, FYI.) The room shot above is a poor representation of the light color/quality. That’s because the lights are serving as both light source and subject. If I chose one or the other (as in the top photo) they would look good. And to the eye they look great.

• Dimmers on each circuit and dimmable LED bulbs will give you lots of options to shape the room. Just make sure to use modern “triac” style dimmers (most all sold today are this type). Those work best with LED lights and also don’t just waste energy through resistors when you dim down.

• In the overall cost scheme of remodeling a room, decent lighting design (and the forethought of a photographer’s approach to lighting) is about the best value you can get for your dollar. I’ve done this with every single room we have remodeled, and have been really pleased with the results.

Orbis is Going Away. Grab One (for Cheap) While You Can.

For those of you late to the party, the Orbis Ring Flash Adpater is a passive, add-on light shaping device that turns your speedlight into a ring flash. There are others, but for a slew of reasons the Orbis has long been my favorite of the lot.

And it is about to go away forever. This post is a quick heads-up to grab one while you can—and a pointer to a fantastic deal on the last units as they are closed out.

The Orbis was developed in 2008 as a sophisticated answer to the DIY efforts of the Strobist community. After seeing what was possible with cereal boxes, aluminum foil and gaffer’s tape, reader James Madelin wanted to build something better. Meaning nicer looks, better durability, more efficiency, more color correct and with a better quality of light. So that’s exactly what he did.

The Orbis is surprisingly complex on the inside in the way it bends light around the donut. It strikes the balance between lighting efficiency vs. evenness (both being very important) just about as well as possible.

Interestingly, of all of the best ring flash adapters, the Orbis was the only one that was never knocked off by the shady Chinese photo gear copiers. It’s not that they never thought of it. Lord knows, they put out crap versions of all the others.

My guess? They cut one open, took a look inside and said, “Eff this. Let’s knock off the Ray Flash instead.

What it Will Do

The Orbis Ring Flash Adapter is not a flash. It is a passive light mod that mounts onto your existing speedlight.

Used alone, on-axis (classic ring light position) it creates that signature glam ring light look as seen above. And because it retains any TTL functions of the speedlight crammed into it, the Orbis is very popular with club/event photographers. Stick on a wideangle lens, work two stops over the ambient in TTL mode, and the results look cool as crap.

And that’s fine for event shooters. But I prefer to use mine more in a way inspired by portrait shooters like Greg Heisler and Dan Winters.

In this mode, the Orbis becomes a very sophisticated fill light. You can use it in combo with another off-camera speedlight acting as key light, and it fills in the gaps—to whatever level you choose based on how you power it.

The photo above of poet Linda Joy Burke is a good example. The key light is coming from upper left. I am working well above the ambient with my flash exposure. So Linda’s shadow side would be very, very dark without the Orbis that is wrapped around my lens.

The light from the orbis reaches into the shadow side without really adding any footprint, and creates legibility. How much? Your choice. Just dial the power of the ring-fill light up or down as much as you want.

This is a common way for portrait photographers to create exactly the amount of legibility they want in the shadows. Which means you can get more creative and/or edgy with your key if you want. ‘Cause the ring is gonna save your ass in the shadows.

Same here with this photo of blogger Sian Meades, done in London. I am in full shade here, and this light is completely being created with two speedlights.

The key light is at hard left, raking across Sian’s face. The fill light, in an Orbis, stuck right on my lens, is creating the legibility in the shadows of the key.

The ambient component here is minimal. Without the flashes the photo would be near black. The on-axis Orbis gives me complete control of my shadow density.

(To learn more about lighting either of these two photos, click on either one.)

Now or Never

And the Orbis will soon be gone forever.

They sold over the last seven years for $200, rarely if ever discounted. But the remaining units are being closed out for $129 (w/free shipping in US.) Or you can get it with the hands-free arm for $139 (+$7.40 shipping in US.)

This is a great deal. Because not only will it work on nearly any speedlight (but not bigass Vivitar 285s, sorry) it is built to last you likely for the rest of your shooting life.

Which is a good thing, because you’re not gonna be able to replace it.

So if you are headed to Amazon this week for a little remote-control Christmas shopping, you could do far worse if you decide to pick up a l’il sump’m sump’m for yourself to ring in the New Year.

Orbis Closeout: $129, free ship US

Orbis Ring Flash Adapter w/Arm: $139 + $7.40 ship US

On Assignment: Studio in the Wild

Jonny Armstrong is a photographer who is used to the idea of being stood up. In fact, in his field of work it happens most of the time. A research scientist, his work includes photographing lit portraits of wild animals in their natural habitats.

Read more »

QA: Cylindrical Aquarium Umbrella Reflections

Photo ©Alison Carlino

Reader Alison Carlino asks, via Twitter:

“How could I light posed formals in front of tank w/no umbrella reflection showing?”
__________

Welp, there’s good news and bad news.

The bad news is there is no way to effectively stop those reflections from happening. I mean, it’s a CYLINDER for Pete’s sake, right?

Fortunately, there is also good news. And it’ll probably result in a forehead-smack moment for you.

Read more »

Strobist 2015-08-11 21:25:00

You are currently in blog view. Click here to revert to knowledge bank view.

QA: Shooting Events Without TTL Flash

Reader Christopher Wharton has a flash-camera combo that will not work in TTL mode, so how he can shoot run-and-gun events?

Long forgotten in the age of TTL, this post explains how to use your flash’s “automatic” mode.

Read full post

Kinda Genius: The LP742 LightSwitch

See that? That’s the high water mark to date for my dual-purpose creativity with a speedlight case. Being padded, I use it as a thermos for my station-purchased beverage when home-bound from New York City on the train.

(Works totally ace, BTW.)

But that bar just got seriously upped today by the LumoPro LP742 “LightSwitch” speedlight case.

Read full post

On Assignment: The Light You Don’t See

This photo is 100% flash, 0% ambient. But it almost looks like the reverse. And for this portrait of soprano Robin Steitz, a timeless available-light look was what we were going for.

But when you are working with flash (a single speedlight) and controlling your light (a scrounged “fill blanket” from the couch) you can keep the best of both worlds of strobe and ambient.

Read full post

GPP PopUP Seattle: What to Expect

Several folks have asked for more specifics on the Seattle GPP Pop-Up on Sept. 19-20. So here’s the long version.

Read full post

On the Road? Backup Without the Bulk-Up

I seldom review gadgets these days, but sometimes something is so useful that it’s worth telling people about. Such is the case with the SD card-enabled Western Digital My Passport Wireless hard drive.

Read full post

Your Basic Lighting Kit: A Spin Around the Block

So the UPS guy just dropped your very first lighting kit at your front door. WHAT DO YOU DO NOW?

Read full post

On Assignment: I Got Rhythm

A cool little trick that forever changed the way I photograph dancers.

Read full post

On Assignment: Lighting Like Leo

In which we travel to London to serve as a lighting tech for a documentary. Our goal? Lighting for a photographic reproduction of the Mona Lisa.

Read full post

Inspiration: Atbin Eslami’s Video Bio

Such a simple idea, and not so difficult to do—unless you count all of the self-inspection it will require. Iranian-born (now in Dubai) photographer Atbin Eslami’s video-bio of herself first made me think, “that’s really cool.”

And second, “Why haven’t I done that?”

Read full post

On Assignment: Ben Lurye

Who needs a studio when you have a bridge abutment? Today, we’ll explore a few of its facades while making an actor’s portrait.

Read full post

Gear: Choosing a Tripod

Little? Big? Aluminum? Carbon fiber? New? Used?

Three legs, many choices.

Read full post

On Assignment: Full-Sun Group Shot

Full walk-through: Using a leaf shutter and two battery-powered monoblocs to bend the sun to your will.

Read full post

On Assignment: Cellist Carolyn Rosinsky

Racing against encroaching dark and a string of thunderstorms to photograph a super-expensive cello with a super-cheap plastic lens….

Read full post

On Traveling With Your Camera

How I spent 2014: traveling around the world for Lynda.com, to help you get the most out of your next trip…

Read full post

The Strobist Guide to Lighting Indoor Sports

Whether you have one light, two lights, three lights or four, here are some tips on how to best put them to use when photographing indoor sports.

Read full post

You Want This: Dan Winters’ Road to Seeing

World-famous portraitist Dan Winters uncorks an epic tome that will serve as a road map for many an aspiring photographer.

Read full post

How To: Strip-Gel a Beauty Dish

Just what the headline says—yes, you can get perfect coverage for your beauty dish with just a small strip gel.

Read full post

Chokra-and-Awe: Loren Wohl Blasts Throught the Fog and Noise

Go behind the scenes with music photographer Loren Wohl to see how his beautifully backlit images were created.

Read full post

We All Screw Up. Don’t Worry About It.

Think you;re the only one who uncorks the occasional burst of idiocy? Well then let me tell you a little story…

Read full post

__________

For older posts, please see the Monthly Archives dropdown menu on the right sidebar.

QA: How to Shoot Events Without TTL Flash

Technology is great. But it can also make us its slave.

For instance, TTL flash is pretty good at solving lighting problems on the run. (See, McNally? I’m open-minded…) But those problems existed long before we had TTL flash—or TTL exposure metering, for that matter.

And yet, we solved them on a regular basis. Even without feedback on the backs of our cameras. Or autofocus. While walking five miles to school barefoot in the snow. Uphill. Both ways.

Read more »

Kinda Genius: The LP742 LightSwitch

See that? That’s the high water mark to date for my dual-purpose creativity with a speedlight case. Being padded, I use it as a thermos for my station-purchased beverage when home-bound from New York City on the train.

(Works totally ace, BTW.)

But that bar just got seriously upped today by the LumoPro LP742 “LightSwitch” speedlight case.

Read more »